Action Panning

One area of photography that I find challenging, yet rewarding, is doing an action pan.  To make a successful panning shot, you need to slow down your shutter speed.  However, this makes it difficult to get a sharp image because you are taking a photo of something that is moving very fast.  So what’s the best technique to do this?

Let’s start with the camera setup.  You’ll want your camera in continuous shooting mode, and trust me when I say you will capture a lot of bad images for every good one.  Next, you’ll want to switch to shutter priority.  This is Tv mode on Canon cameras or S mode on Nikon.  Set your shutter speed to something slower than you are used to.  Maybe 1/50th or 1/100th depending on what you are capturing.  Finally, you’ll want a moderate telephoto lens to make this most effective.  A 70-200mm lens would be a minimum zoom you would want.  A 300mm or 400mm lens would be better if you are trying to track wildlife at a greater distance.

Now, the key here is to practice keeping your subject in the exact same spot in your camera’s viewfinder.  Even if the subject is moving very fast (which this technique works best with), you’ll want to follow the path of the subject very closely.  When the framing matches the look you want to attain, hold down your shutter and let your camera capture a bunch of shots.  After doing this, you can usually go back and look at what you have on the camera, but typically you won’t know if you really have any keepers until later on when you look at your photos on a computer.  Let’s look at some examples.

First, here’s an example of a shot I took a couple of years back.  There was a winter X-games type of event at a local track, and it was very entertaining to watch.

pan_atv

Typically on a fast action shot like this, you’ll want as fast of a shutter speed as possible to freeze the motion and get a sharp frame.  1/1000 of a second, or even higher is desirable.  However, I really wanted to blur out the background and capture the feel of this racer traveling so quickly.  So I slowed down my shutter to 1/200 of a second and did my best to pan with the racer.  When you are photographing something in an environment like this where the subject will be on a single plane (racing along level ground), it’s helpful to have a monopod to help take out some of your handshake.  I mounted my camera on a Manfrotto monopod while capturing this particular event.

Here’s another more recent example at an airshow this past summer.

pan_aircraft

In this situation, a monopod isn’t going to do you any good.  The aircraft that are performing are traveling both horizontally relative to the ground as well as vertically, so you’ll need the flexibility of capturing handheld.  Here I slowed down the shutter to around 1/100 of a second.  If I could go back in time, I would have probably slowed it down a little further still, to 1/50th or 1/30th even.  That would have blurred out the car in the foreground even more.  Again, the key is you need to keep your subject in the middle of the viewfinder as you are taking photos.  This way, even though the subject is moving fast, the relative movement to your camera’s view is very slow.  That’s the only way you are going to catch a sharp image.

The other thing to keep in mind when photographing aircraft with propellers, you really want to have a slow shutter speed at all times.  If you use a high shutter speed to capture a prop-driven airplane, you’ll freeze the prop in mid-air and it will look like the airplane is falling out of the sky.  It doesn’t really turn out well at all, so keep that shutter speed down!

While it might not be too often when you’ll be in a situation where you want a shot like this, it’s not hard to practice this technique so you are ready for the real deal.  Just stand on any busy street corner and try to capture shots of cars as they drive by.  This gives you a chance to get used to tracking subjects, so the next time you are at a sporting event or out photographing wildlife, you’ll be ready.
Beautiful, but Believable

Photography, like other art forms, rarely has a right and wrong answer when it comes to an image. What looks perfect to some people, might look horribly wrong to others. One style which has become popular enough recently to almost be considered cliche is bumping the image saturation. That saturation slider in your photo app is oh-so-tempting, nudging you on to increase the saturation just a little bit more to make those colors pop.

Don’t get me wrong, I don’t have a problem with boosting saturation a little. Most cameras add a built-in saturation boost when creating JPEG images. Some cameras will let you adjust how much saturation is added via in-camera photo styles. If you are shooting in RAW format you won’t get that adjustment, so you’ll want to add saturation to compensate for the occasionally bland images that the RAW format generates. (The benefit to the somewhat bland RAW start image is that you will have a more even histogram and thus better flexibility while making color and exposure adjustments, but I digress.) Many RAW images look more like the scene you remember when the colors are saturated a bit.

The problem with boosting the saturation too much is eventually you get to a point where the colors shown in your photo are no longer believable. If the grass looks more neon than foresty, you’ve gone too far. Likewise, a person’s face being flushed is another indication that the saturation was overdone.

So what can we do as photographers to produce beautiful images with crystal clear blue skies that aren’t overdone? Well, there are a couple of options. First, if you are making a landscape image, try boosting the vibrance instead of the saturation. While the saturation control boosts all the colors, the vibrance control is stronger on the green and blue parts of the spectrum, so you can increase it without blowing the reds and other colors out of proportion.

The second thing you can do is purposefully back off on the saturation bar. When I’m developing an image, I increase the saturation or vibrance to where I think the photo looks best, but then back away about 30% of the adjustment. The amount is slightly different for each image, but purposefully making this second adjustment keeps your perspective in check and ensures that your images still look realistic when you share them.

Keep in mind that (unless you are purposefully going for a surreal look) you should be trying to make your photograph match the scene you remember as closely as possible. That natural feel is what will be most appreciated by your audience in the long run.

Controlling your ISO

Before I really got into photography as a hobby, I kept my camera on the green auto mode pretty much all the time.  This way, the camera can do its thing to make sure the photo turns out right…well 90% of the time.  The problem was with that extra 10% of the time:  I wanted good photos then too.  And sometimes I felt like the photos that did turn out okay could have been a little bit better.  So I started looking towards the other camera modes.

If you’re used to taking photos in the green auto mode, the next mode you’ll want to learn is the P mode.  P stands for Program auto-exposure.  It gives you some control over the settings of the camera, while taking care of most of the rest for you.  The big setting it lets you change is the ISO.

Back in the film days, the only way to change your ISO (or ASA as it was sometimes called) was to put in a different roll of film.  Film with a higher ISO number was more sensitive to light.  If you were going to take photos indoors, you used high ISO film so your shutter speed can be quick and thus avoid blurry shots.  Outside, you could use a low ISO film because there was plenty of light for a fast enough shutter speed.

So why not just use a high ISO film all the time?  Well, that extra light sensitivity comes at a cost.  As you step up the sensitivity, you add grain to the image.  This reduces sharpness and makes everything look a bit fuzzy.  If you look at an older cell phone camera shot in a dark night club, you’ll know exactly what I’m talking about.

Digital cameras are convenient because you don’t have to change the roll of film in order to pick a different ISO.  You can set the ISO separately for each photo you take.  The P mode on your camera allows you to do just that.

Typically a camera will have a native or base ISO where its sensor works the best.  On most Canon cameras, the native ISO is 100.  For Nikon, most cameras shoot natively at ISO 200.  For each doubling of the ISO, the sensor is twice as sensitive and your shutter speed can be twice as fast.  So if you are in a darker room where ISO 100 gives you a proper exposure at 1/15th of a second, bumping the ISO to 200 will give you the same exposure at 1/30th of a second.  Most of the time you want your shutter speed to be 1/60 or faster, so in this case you would bump your ISO further to ISO 400 to get the desired 1/60th of a second shutter speed.

The thing is, you can do a much better job of picking an ISO than your camera can.  If you keep your camera mode on auto, it will probably try to get the shutter speed to be around 1/60th of a second, and boost your ISO to reach that speed.  The problem comes when you are in a darker room and it starts pushing your ISO too high (ISO 3200, 6400, or even higher).  You’re going to end up with more noise in your images, and that’s not good.

Maybe you have calm nerves (have avoided caffeine for awhile, etc) and can hold your camera steady for 1/15th of a second while still getting a sharp image.  If that’s the case, then you can set your ISO in P mode until you see that your shutter speed is going to be around 1/15th of a second.  This will be a much lower ISO than if the camera was trying to reach a 1/60th of a second shutter speed.  You’re custom ISO image will turn out much cleaner.

I shot for years all the time in P mode.  When I was outside, I would set my ISO at 100 and forget about it.  When I went inside, I would start boosting my ISO, but I started to learn how high I could push the ISO before my camera would start producing too noisy of an image.  For my old compact camera, that was ISO 400.  For my first Canon 450D DSLR, I could push it to ISO 800 and still get nice images.  For my 5D Mark II, I can push around ISO 3200 or 4000 and still get solid images.

Once you know how your camera behaves at different ISOs, you can make a decision of whether you should push your ISO higher, or if you should change something else to get a better photo.  Whether that means using a flash, putting your camera on a tripod, leaning up against a wall to steady yourself, etc.  You now have that extra little bit of control.

Sometimes you have no options but to boost your ISO.  The common example of this problem is at weddings when you are in a dark reception hall.  In this situation, I would recommend raising your ISO as high as it needs to be to get a sharp image.  You’ll end up with more noise, but a grainy photo is almost always better than a blurry photo.

Photo Recipe: Wagner Falls

A couple of years ago, I went to Wagner Falls for the first time and really fell in love with the scene.  There was just enough water falling over just the right arrangement of rocks, that I just really liked the look of it.  I took a photo that day, and while it was good, it didn’t quite turn out the way I wanted it to:

Wagner Falls in 2011

As you can see from the photo, it was a sunny day, and though the tree canopy is pretty thick in this particular area, there was good portion of the photograph where the sun reached the ground and blew the highlights in that area of the image.  While I enjoyed visiting the falls that year, the resulting photos were a bit disappointing.  So this year when we planned to visit the same area, I really wanted to make sure we made it over to Wagner Falls again.

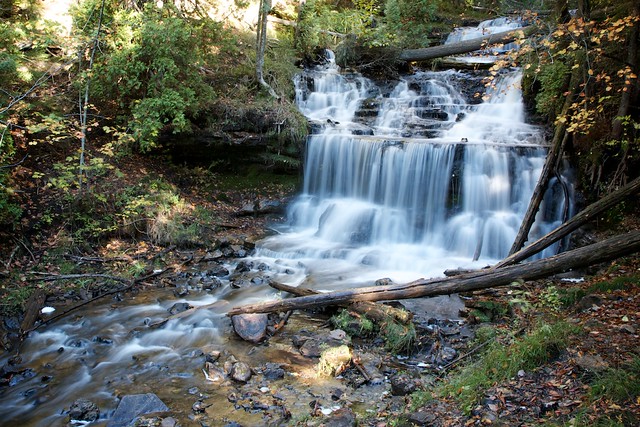
Fortunately, this time the environment was completely different.  The day we were out driving, a pretty big low pressure system was moving through the area, and it was completely overcast with rain off and on all day long.  It was…perfect!

0013-WagnerFalls-1024

While you might seriously consider skipping out on a photo opportunity in the rain, photographing foliage is great when everything is wet.  The moisture brings out the color of the leaves, naturally boosting their saturation.  With a cloudy sky, the lighting is even across your entire photo, leaving out the harsh shadows and blown-out areas caused by direct sunlight.

These benefits come with caveats.  When trees are wet you’ll find that light can glare off the leaves, which takes out some of the color.  You’ll also have to make sure you keep your camera equipment dry if it’s raining.  And that cloudy sky doesn’t provide much light for your camera to work with in the middle of a dense forest.  Fortunately, there are ways to overcoming these caveats.

The glare is the biggest problem, but can be controlled with the use of a circular polarizer.  Polarizer filters reduce glare by filtering out any light that isn’t polarized.  When light bounces off a glossy surface, it changes orientation, which we see as glare.  The polarizer blocks this bent light and only allows the polarized direct light to pass.  You can rotate the filter to control the strength of the affect and achieve the results you are looking for.  You don’t necessarily want to turn the polarizer up to it’s highest strength, because as it removes glare from your image, it will also cut out reflections in the water that might otherwise add a nice element to your photo.  You’ll have to look through your viewfinder as you rotate the polarizer to find the best balance.  In this situation, I didn’t have a pool of water for reflections, so I didn’t worry about turning up the polarizer too much.

As for there not being much light, to overcome this you need to use a tripod.  That way, you can lengthen the exposure to allow more light to hit your camera’s sensor without introducing any blur from camera shake.  The additional benefit here is that a longer exposure helps blur the water in the frame, so you have that nice silky waterfall effect.

Framing the shot, I wanted to try and make the falls look big so they would fill the frame.  The best way to do this is to get down low.  In this case, I had to go off the trail and hike down into the riverbed to take the photo.  Make sure you are wearing a pretty good pair of boots to keep your feet dry.  I chose this vantage point because it allowed for some of the autumn leaves to make it into the upper-right corner of the frame, while providing a great view of the rocks in the stream bed.

As for the actual composition once I got there, I broke the rules.  Sometimes you should put the waterfall in the middle, and sometimes you should follow the Rule of Thirds and put it a third of the way into either side of the image.  In this case, neither of those options looked right.  I chose to place the center of the waterfall about 40-45% of the way in from the right side.  The reason for this is the stream exiting the left corner of the frame.  This throws the balance of the photo to the left a little bit, so to compensate, I moved the center of the waterfall to the right.  I did use the Rule of Thirds in the vertical direction though.  The large fallen tree is about a third of the way up the frame from the bottom, and the top of the tallest falls is about a third of the way down from the top.

Getting down to the technical details.  I locked the camera on my tripod, and used a 2 second timer to reduce vibrations.  ISO was set to 100, to reduce noise and lengthen the exposure for a smoother look in the water.  I used an f/8 aperture to keep most of the falls in focus while allowing the background to blur out a bit.  With this combination and the amount of light available, the exposure time was 1 second.  I adjusted the white balance using the color of the water in free fall, and this brought out even more of the color from the foliage.

Overall, I was very happy with how it turned out.  I’m sure I’ll go back again someday (it’s always a good idea to photograph the same spots repeatedly, you’ll usually find a different aspect of the scene to focus on and take away something new), but if not, I’ll be happy to remember the falls as they were captured this day.

Lens Rundown

This video is helpful at showing the creative possibilities available while using different camera lenses.

http://wistia.com/learning/get-creative-with-lenses (Image credit: wistia.com)

My Advice
With a limited budget, I always advocate spending more money on lenses as opposed to cameras. Cameras are just like any other technology purchase, as they get older, new ones come out with more features and the old ones just lose value over time. Lenses are different though. They hold their value over time, and in some cases their value increases as manufacturers raise prices to match inflation. When you buy a lens, you can reasonably expect to be using it for the next 20 years, even with new cameras as they come out.

It doesn’t just make good financial sense to spend more money on lenses though. A good lens on an inexpensive camera will offer much better image quality than a cheap lens in an expensive camera. These days, DSLR cameras are so good, that even the lower-end models can take beautiful photographs if you have the right lens.

What’s in my bag?
I currently use three different lenses on my DSLR. Most of the time I use a 24-105mm f4L IS. This is a really nice walk-around lens because it covers images from wide-angle to short telephoto zoom. It also has image stabilization, so I can still get pretty sharp shots even if I don’t have a tripod with me. The primary drawback of this lens is weight, it’s definitely heavier than a lot of other lenses in this focal range. Also, while it’s not as costly as the highest quality lenses in this range, it’s not an inexpensive lens by any means.

For a regular telephoto zoom, I use the 70-200mm f4L. For a telephoto, it’s not too heavy, and it produces very sharp images. It doesn’t have image stabilization, which can be a drawback because a stronger zoom will amplify any camera shake from holding it. I use it mostly outdoors in brighter light, or on a monopod indoors when I need to. It’s also one of the least expensive lenses in Canon’s professional L series.

The last lens I have is a 50mm f1.8 prime lens. Prime lenses don’t zoom, which throws some people who aren’t familiar with primes. I’ve had people borrow my camera with this lens mounted, and turn the ring on the lens and be surprised to find that it will change focus but not zoom. Prime lenses are great in low-light situations. This 50mm lens gathers over 4 times more light than either of my other two lenses, which makes it perfect for indoor shots at night. It’s also very small, very light, and inexpensive. If you have a DSLR with just a kit lens, there is no better way to improve your photography than to spend $100 on a nifty 50.

Next steps…
My next lens will most likely be a stronger telephoto, somewhere in the 300mm or 400mm range. It would open up a lot more wildlife shots for me. While the 70-200mm will be great for wildlife you are close to (in a zoo, for example), 200mm is still a little short if you are further away from an animal as in the wild.

After watching this video, an ultra-wide angle 16-35mm f2.8L (or the less-insanely-priced 17-40mm f4L) would really provide a lot of creative possibilities. Someday maybe I’ll try one out.

Grand photos from tiny places

I used to think the best landscape photos were sweeping images of grand vistas.  The type of images you only get in the National Parks.  However, sometimes you can get some great landscape images in really small places.  You really don’t have to travel far and wide to get the best photos.

Mushrooms

Take these mushrooms for instance.  I took this photo just outside a cabin we were staying in.  There was a tree stump out front, and on one side there were a couple of cool looking mushrooms.  Looking back, I would have composed this image slightly differently, but the point is that it makes for a nice landscape image.

IMG_0836

This second image was actually taken in Yosemite, a place that has no shortage of grand vistas.  However, this shot was taken on a very small scale, and it turned out to be one of my favorites from the trip.  What I like about it is that it summarizes some of the amazing life in the park and surrounding region, even on a smaller scale.  The Redwood is a signature tree in the northern Sierra mountains, which makes this photo unique to that particular region.  Each Redwood is pretty majestic on its own, but it can be pretty amazing how much smaller scale life is supported by each of these larger trees.  The green moss in this photo really captures a whole other world at a smaller scale.

8502800784_3e66dd90bf_o

This last photo was actually captured in our backyard a couple of years ago.  We just had a big snowstorm come through, so I went outside to take some photos.  I got quite a few shots of the mounds of snow that were everywhere, but one of my favorites was this close-up shot of a pine tree.   A lot of people will see the snow-covered tree and appreciate its beauty, but if you spend the extra time to look more closely, there is a lot of beauty and detail even on individual branches.  In my eyes, the ice crystals on this branch were more amazing than the snow covered tree viewed as a whole.

I guess my point is: don’t wait until the next time you are on the trip of a lifetime to take a photograph.  You can make some really great shots just by spending some time to look around in your own backyard.

Photo Recipe: Lake of Glass

Today I’m going to give you the “photo recipe” to take a shot like my Lake of Glass.

0006-LakeOfGlass-1024


Obviously you have to start with a strong composition to begin with.  Here, it was dusk on Au Train Lake, just long enough after sunset that the sky still had some color, but not long enough that it was too dark.  Most people will take photos until the sun sets and then take off.  It’s a shame, because as long as you have a tripod, there is still a lot of color in the sky for about 20-30 minutes after the sun sets.  I was facing East when taking this photo, so the sun was setting behind me.

The hazy water effect can definitely add a certain feel to a photograph.  Here, the lake I was photographing was already pretty calm.  It was the end of the day and the wind had died down long ago.  But it wasn’t as smooth as the water shown in the photo.  How’d I get it to look that smooth?

The answer is in the shutter speed.  I used a longer exposure time, so the camera would average the scene over the entire amount of time the shutter was open.  In this case, I kept the shutter open for 5 seconds.  This is enough time for the water to move around a bit, giving that hazy feel.  For this to work, you absolutely must have your camera on a tripod, otherwise the things you want to have in focus (the dock and the tree line across the lake) will be incredibly blurred from your moving the camera during those 5 seconds.

There are several ways to keep the shutter open longer on your camera.  If you have a camera with manual controls, you want to set it to shutter priority mode, (Tv on Canon, S on Nikon).  This mode will let you set the amount of time the shutter is open.  You’ll want to use a time that is at least 2-3 seconds long, and preferably 10+ seconds.

In order to take that long of an exposure though, you have to keep the amount of light reaching the camera sensor to a minimum.  There are two settings the camera will probably change to make this possible (the camera will make these changes automatically in Tv/S mode).  One is the ISO setting.  A lower ISO setting will make the camera sensor less sensitive.  Use as low of an ISO as possible, so ISO 100 or ISO 50 if your camera allows it.

The second camera setting to watch is the lens aperture.  Every lens has aperture blades that close to a certain diameter hole when you take a picture.  If the blades close to a smaller hole, less light will get to your sensor and you can take a longer exposure.  In the photo above, I used f/22, which was the minimum for my lens.  One thing to keep in mind here is that higher f numbers correspond to smaller aperture openings, so keep your f numbers high.

You can also reduce the amount of light reaching your camera sensor by attaching a filter in front of your lens.  In the case above, I had a polarizer on the lens, which cuts the amount of light about in half.  This let’s me use a 5 second exposure instead of a 2.5 second exposure.  The ideal filter to use in a situation like this is an neutral density (ND) filter.  An ND filter is just like putting a pair of sunglasses on your lens.  It dims the amount of light reaching your camera sensor by several orders of magnitude, depending on the filter.  With a strong ND filter, you can take a several second exposure even in broad daylight, without resulting in an over-exposed image.

So that’s it, the recipe for Lake of Glass.  Thanks for reading!

Going “Pro”…

I’ve taken pictures for most of my life.  My first camera was a 110 format film camera back when I was a kid (click, crank, click, crank…).  Before digital, it never really interested me as a hobby.  It took too long between capturing a photo and viewing a print.  And the whole developing phase had a pretty steep learning curve, so unless you were happy taking your film to Walgreens, there wasn’t much to do about it.

Fast forward to the early naughts, where digital cameras came into play.  Take a picture, see the results on-screen instantly. Did it turn out horrible?  No problem, just delete the image and try again.  It didn’t take long for me to develop (pun intended) a keen interest in the hobby.  I’ve taken tens of thousands of photos since then, and have enjoyed every minute of it.  But it’s always just been a hobby.

Over the past year or so, I started thinking about selling my photographs.  There was never enough time to actually go through the work of doing it though.  And what happens if I go through all this work of setting up an online store only to find nobody cares enough to buy a print?

Eventually the idea kept eating away at me, and I decided it was time to go for it.  I came across Fine Art America a few weeks ago as a place to sell prints.  They provide all the online ordering services, printing, and shipping.  I just have to bring the photos and set the pricing.  That made things just a little bit too easy to pass up.

I’m starting with a pretty small sample of images on here for the time being, but I’ll be adding more images as time goes on.  Each photo has a link to the page at Fine Art America where you can place orders for standard prints with or without frames, canvas prints, or even metal prints.  They have a lot of nice products there to choose from.  I try to stick with the standard photo sizes, to keep customers from having to buy custom frames, but it’s not always possible depending on the shot.

I am also planning to post photography related articles to this blog.  Be sure to subscribe to the RSS feed, or follow Radiant Lens on Facebook.  Thanks for visiting!