A couple of years ago, I went to Wagner Falls for the first time and really fell in love with the scene. There was just enough water falling over just the right arrangement of rocks, that I just really liked the look of it. I took a photo that day, and while it was good, it didn’t quite turn out the way I wanted it to:
As you can see from the photo, it was a sunny day, and though the tree canopy is pretty thick in this particular area, there was good portion of the photograph where the sun reached the ground and blew the highlights in that area of the image. While I enjoyed visiting the falls that year, the resulting photos were a bit disappointing. So this year when we planned to visit the same area, I really wanted to make sure we made it over to Wagner Falls again.
Fortunately, this time the environment was completely different. The day we were out driving, a pretty big low pressure system was moving through the area, and it was completely overcast with rain off and on all day long. It was…perfect!

While you might seriously consider skipping out on a photo opportunity in the rain, photographing foliage is great when everything is wet. The moisture brings out the color of the leaves, naturally boosting their saturation. With a cloudy sky, the lighting is even across your entire photo, leaving out the harsh shadows and blown-out areas caused by direct sunlight.
These benefits come with caveats. When trees are wet you’ll find that light can glare off the leaves, which takes out some of the color. You’ll also have to make sure you keep your camera equipment dry if it’s raining. And that cloudy sky doesn’t provide much light for your camera to work with in the middle of a dense forest. Fortunately, there are ways to overcoming these caveats.
The glare is the biggest problem, but can be controlled with the use of a circular polarizer. Polarizer filters reduce glare by filtering out any light that isn’t polarized. When light bounces off a glossy surface, it changes orientation, which we see as glare. The polarizer blocks this bent light and only allows the polarized direct light to pass. You can rotate the filter to control the strength of the affect and achieve the results you are looking for. You don’t necessarily want to turn the polarizer up to it’s highest strength, because as it removes glare from your image, it will also cut out reflections in the water that might otherwise add a nice element to your photo. You’ll have to look through your viewfinder as you rotate the polarizer to find the best balance. In this situation, I didn’t have a pool of water for reflections, so I didn’t worry about turning up the polarizer too much.
As for there not being much light, to overcome this you need to use a tripod. That way, you can lengthen the exposure to allow more light to hit your camera’s sensor without introducing any blur from camera shake. The additional benefit here is that a longer exposure helps blur the water in the frame, so you have that nice silky waterfall effect.
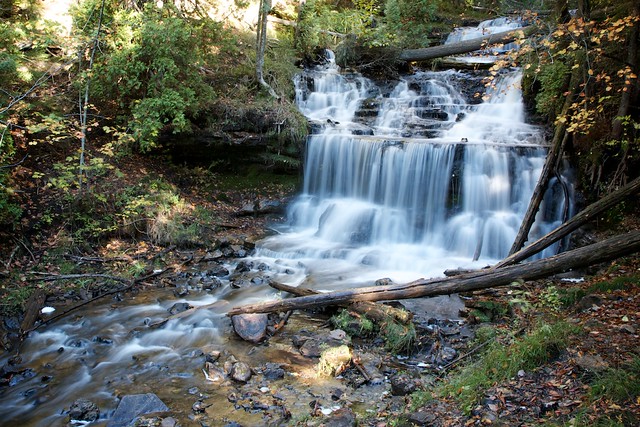
Framing the shot, I wanted to try and make the falls look big so they would fill the frame. The best way to do this is to get down low. In this case, I had to go off the trail and hike down into the riverbed to take the photo. Make sure you are wearing a pretty good pair of boots to keep your feet dry. I chose this vantage point because it allowed for some of the autumn leaves to make it into the upper-right corner of the frame, while providing a great view of the rocks in the stream bed.
As for the actual composition once I got there, I broke the rules. Sometimes you should put the waterfall in the middle, and sometimes you should follow the Rule of Thirds and put it a third of the way into either side of the image. In this case, neither of those options looked right. I chose to place the center of the waterfall about 40-45% of the way in from the right side. The reason for this is the stream exiting the left corner of the frame. This throws the balance of the photo to the left a little bit, so to compensate, I moved the center of the waterfall to the right. I did use the Rule of Thirds in the vertical direction though. The large fallen tree is about a third of the way up the frame from the bottom, and the top of the tallest falls is about a third of the way down from the top.
Getting down to the technical details. I locked the camera on my tripod, and used a 2 second timer to reduce vibrations. ISO was set to 100, to reduce noise and lengthen the exposure for a smoother look in the water. I used an f/8 aperture to keep most of the falls in focus while allowing the background to blur out a bit. With this combination and the amount of light available, the exposure time was 1 second. I adjusted the white balance using the color of the water in free fall, and this brought out even more of the color from the foliage.
Overall, I was very happy with how it turned out. I’m sure I’ll go back again someday (it’s always a good idea to photograph the same spots repeatedly, you’ll usually find a different aspect of the scene to focus on and take away something new), but if not, I’ll be happy to remember the falls as they were captured this day.
