Most people associate Kevin Durant with the NBA. However, one of his hobbies is photography, and by a stroke of luck he got an offer to cover Super Bowl 50 from the sidelines. It was interesting to see the parallels between his experience photographing the Super Bowl and my own experience photographing a Central Michigan University football game last October.
Radiant Review: Canon 70-200 f4L
I thought I would try something new and do a video review of a product. I typically will check YouTube for video reviews of camera gear I’m thinking of buying, just to see what other people say about it in a more visual way.
I’m not much of a video guy, but decided to give it a shot. So here it is, the inaugural Radiant Photography YouTube video: a video review of the Canon 70-200 f4L lens.
I talk about the quality of the lens in the review, but wanted to provide a few examples of what you can expect from the lens.
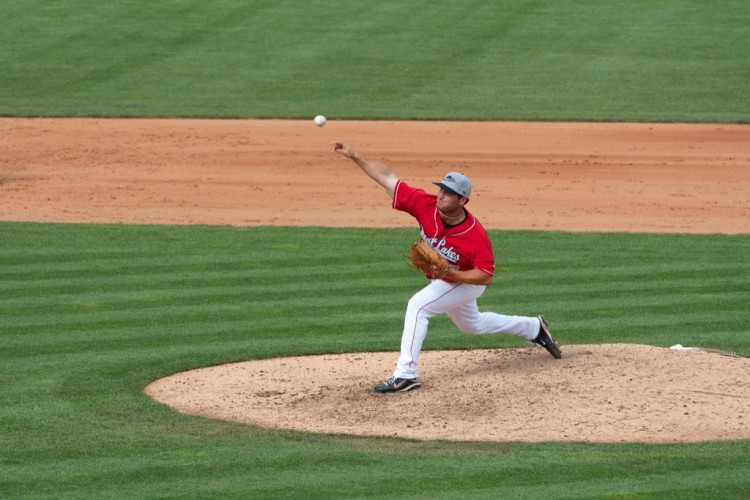
First up is a sports image. This lens is great for outdoor sports in smaller arenas. It’s not quite long enough for football, but it does a nice job of capturing the in-field of a baseball game. Here’s one shot I made from the stands:
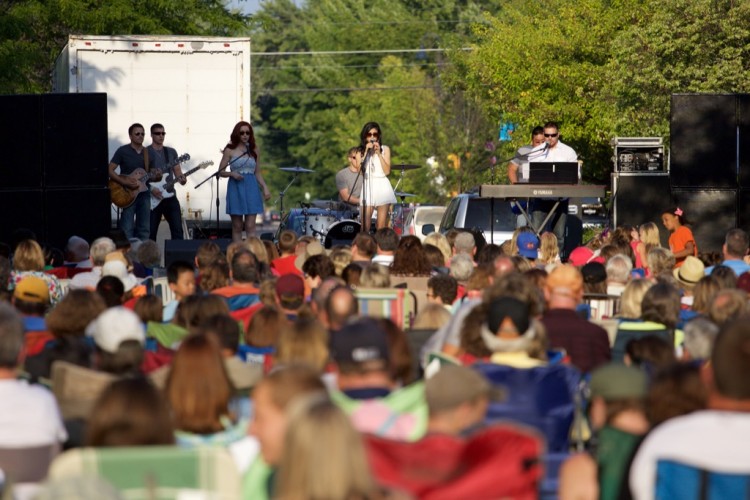
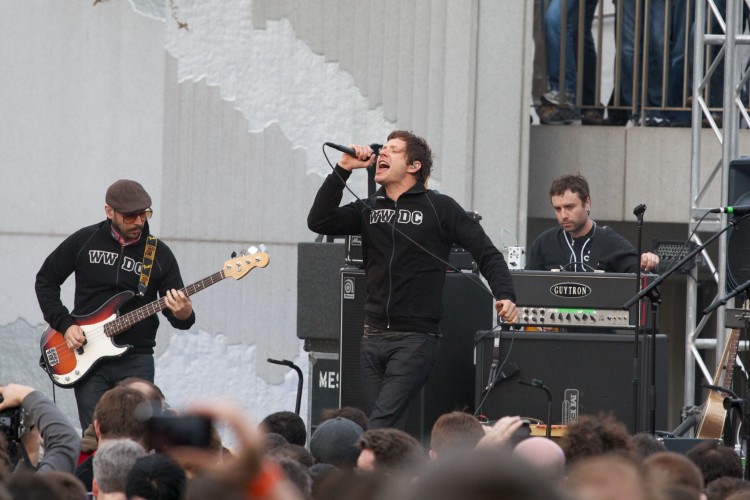
If you are photographing concerts, this is a good focal length to use. Note that most standard ticket-holders aren’t allowed to bring zoom lenses into the venue that are this large. Either you have to use it at an open-air event or have press credentials. Here’s one from a Shubha Vedula concert:
And another from OK Go:
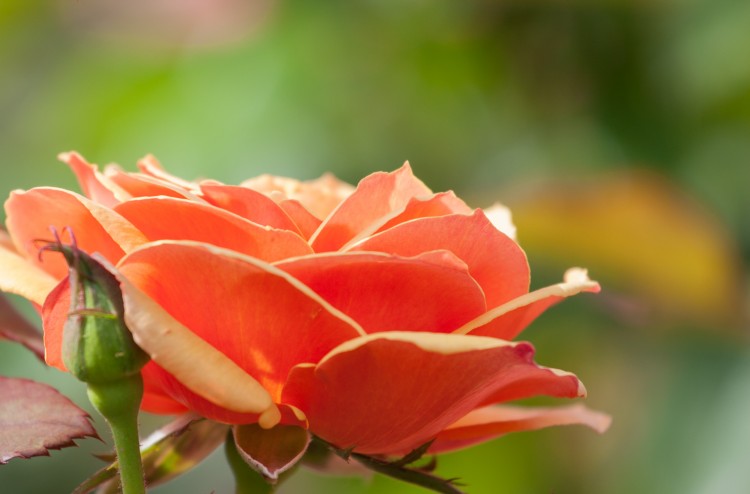
I mentioned the lens’ macro abilities. Now, the 70-200 definitely isn’t a macro lens, but you can get some nice close-up photography with it.
Overall a very good lens. If you have any questions, feel free to leave them in the YouTube comments.
Brookfield Zoo
I’m finally finding time to edit the photos I took over the summer (Michigan winters provide a good opportunity to catch up with things indoors). I was pleasantly surprised to look back at the photos I made during a family day at the Brookfield Zoo just outside of Chicago.
I don’t add zoo photos to my portfolio, because I don’t like that the animal is forced to be there. I feel like you don’t really earn a photo of an animal unless it is truly wild. Regardless, I still wanted to share the photos so I uploaded them to an album on the Radiant Photography Facebook page. Check them out at the link below, and be sure to “Like” the page while you’re there.
Depth of Field
Controlling depth of field is one of the first more advanced topics that an amateur photographer will learn about. Most photographers will switch from full auto mode on their camera to “P” mode and use that for quite some time. Then they will start to look for more control, and for many the next step is controlling the depth of field, or which part of the photo is in focus. When a camera focuses, it makes an object a certain distance away become sharp.
However, even if the focus is set on a certain object, usually things a small distance in front of the object and a small distance behind the object are also sharp. The depth-of-field refers to how much distance in front and behind the focus point is still sharp in a photo. In a landscape photo, you might have a depth of field of several miles, while a close-up macro photo might have a depth of field of less than an inch. When an object is outside the depth of field, it shows up blurry in the image (this is how you get the nice “bokeh” blurry background in portraits, by having a small depth of field focused on a person, and everything in the background outside the depth of field).
Aperture There are a few ways to control depth of field. The most common way was alluded to above, by using aperture priority (Av or simply A) mode on the camera. Aperture priority allows the photographer to set the aperture, which usually has values like 1.4, 2.0, 2.8, 4.0, 5.6, 8.0, 11.0, 16.0, 22.0, etc…
Aperture can be confusing because the number is reversed from what you might expect. A big aperture is actually a small number, and vice versa. For example, an aperture of f2 is a “big” (sometimes called “wide”) aperture, while an aperture of f16 is a “small” (or “narrow”) aperture. This is because the aperture is actually a ratio, equal to the focal length of the lens divided by the width of the lens opening. So a 100mm lens at f2 would have a big lens opening of 50mm. While the same 100mm lens at f16 would have a small lens opening of just 6.25mm.
However, that’s all details and what really matters is how changing the aperture changes the depth of field. Here is where the aperture number makes more sense. You can think of the aperture value representing how much is in focus. So a small aperture number (like f2) results in a small depth-of-field and not much area in focus. A big aperture number (like f16) results in a large depth-of-field and a lot of the image in focus.
Note that you typically don’t want to use aperture values that are larger than about f11. This is because of an effect called diffraction, which causes the whole image to become less sharp. Explaining diffraction is beyond the scope of this article, but the point to take away here is that you don’t want to use too narrow of an aperture.
Focal Length Another lens property that affects the depth of field is the focal length of the lens. The more you zoom in, with everything else constant, the less depth of field you will have. So if you zoom out all the way (wide) on your camera, a lot more will be in focus. Likewise if you zoom all the way in, then a lot less of the frame will be in focus.
Distance from Subject An additional aspect that affects the depth of field is how far you are away from your subject. If you are close to your subject, then depth of field decreases, but if you are far away then depth of field increases and more will be in focus.
How low can you go? So let’s say you want a buttery soft background for a portrait you are taking. You’ll want to set your aperture value as low as possible. This will depend on the lens on your camera, but generally lenses with wide apertures cost a lot more because you need more glass to allow the extra light into the camera. You also have to be careful when setting your aperture too low, because you’ll have a very small depth of field to work with. Next, you will want to zoom all the way in on your lens. Finally, you’ll want to get as close as possible to fill the frame with your subject.
When you combine all three of these, you can get a very narrow depth of field, and that can be a bad thing.
This problem bit me just a few months ago. We were on a trip to Puerto Rico visiting the rain forest. I saw a lizard I wanted to photograph, so I zoomed in and without thinking too much about it I took the following image:
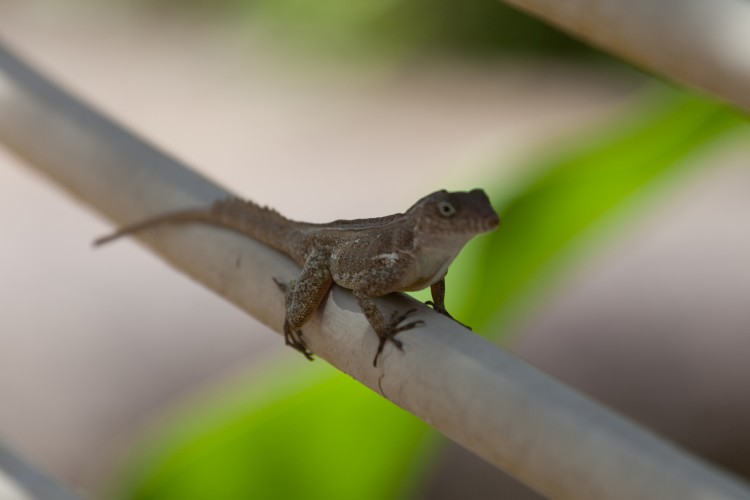
If you look carefully at this photograph, you’ll notice that I missed the mark. My depth of field is not big enough for the whole lizard to be in focus. I focused on the body of the lizard, but an inch in front of the focal point is already starting to get blurry. The reason for this is that I had my lens zoomed all the way in (it was a small lizard, so I wanted it to fill the frame), and I tried to get as close as possible while also setting my aperture to the lowest value my lens supported (f4 in this case).
If I was paying more attention, I would have set my aperture to f5.6 or even f6.3. This probably would have been enough to get the entire lizard in focus. The other alternative would be to focus on the lizard’s eyes instead of just his mid-torso. This is a general rule when photographing any animal or person. You want the eyes in focus because that’s what we look at first and the look in someone’s eyes gives you the best view at their feelings and emotions at that point in time. It’s how we connect.
Landscape Photos On the opposite end of the spectrum we have landscape photos. For landscapes, we want a big depth of field with a lot of area in focus. The best way to do this is to set the aperture to f8-f11 and use a wide angle lens. This will result in a wide depth of field.
A trick here is to focus about 1/3rd of the way into the frame. This will take advantage of a focus property called hyperfocal distance (again, this is too big of a topic to explain in this article). If you focus at the hyperfocal distance, then everything behind that focus point will be sharp in the final photograph. So pick a tree or a rock about 100-200 feet away from you and focus there.
Wrap-up So that’s a crash course in depth of field. The only way to master depth of field is to spend time working on using the different apertures and focal lengths on your camera. Go on a photo walk and play with the aperture settings while varying the distance between you and your subject. This will give you a better idea of what settings you should use to get the desired depth of field for a particular photo, so you’ll be prepared to capture that next amazing lizard shot.
Summer Desktop
Transitions
Lots of exciting news to share about my photography, so I’ll get right to it: my photography hobby is turning into a side photography business. There are two separate ways this is happening right now, and both came about in totally different ways.
First, I am going to start working as a freelance photographer covering events at Central Michigan University. It’s going to be a gradual process starting over the next few months. I’ve already joined Steve Jessmore, the lead photographer at CMU, at one university event last month just to get my feet wet. Over the next few months, I will gradually start working for departments on campus photographing award ceremonies, guest speakers, etc. It’s a great opportunity to take my photography to the next level. I’m really looking forward to it.
Second, I’ll be photographing my first wedding next month. Two friends are going to be tying the knot, so I’m working with them to capture their special day. I’ve used this as an opportunity to learn a variety of portrait photography skills, from posing to lighting. We had a casual engagement session last week, and I feel honored to be a part of their wedding next month.
With the more broad focus comes a new name. I’m dropping the “Lens” and simply naming the business Radiant Photography. You’ll notice that the website domain is new as well: https://radiant.photography/. I’m going to start working on adding additional themed portfolios to the site, and those should be ready shortly.
It’s a pretty big change, but I’m up for the challenge. My software development work at Gaucho Software will continue to be my primary work, but doing freelancing photography work gives me the opportunity to keep practicing the photography I love on a regular basis.
To flash, or not to flash…
When I started paying attention to the quality of photos I was taking, I started to really dislike every shot when I used the flash. Whenever the flash was on peoples faces were washed out (oftentimes with deer-in-the-headlights looks), and backgrounds went dark. I stopped using a flash altogether and instead decided I needed to buy really fast lenses and a camera with a big sensor, so I could take a picture in moonlight and still be able to see the details of someone’s face.
The thing is, you can have the best camera and lens in the world, and still take mediocre photos in low light. Cameras capture light, and when there isn’t any good light to capture, you need to make your own. A flash is really good at making light. So let’s lay down some ground rules.
Rule #1: Know when to turn your flash off.
If you are at a nighttime concert and are more than about 10 feet from the performer, turn your flash off. It’s not going to do you any good, and you’re just going to end up with an image of really bright people sitting in front of you with a performer all in shadows in the background. Countless bad photos are taken this way; just glance at the audience at the next Super Bowl halftime show. In this situation, your flash isn’t making any meaningful light for the scene (you are trying to light a stadium with a candle). Turn your flash off, and let your camera figure out how to get more light for your shot. Most cameras will struggle with the situation, but I guaranty you will end up with a better image.
Rule #2: Know when to turn your flash on.
A lot of people assume that on a bright sunny day, you don’t ever need to use a flash. This is simply not true. When you are taking shots in the harsh mid-day sun, you will have some really strong shadows in your image. When these shadows fall on the faces of the people you are trying to photograph, it’s not going to look good. You need a fill flash to “fill in” the shadows. Turn on your camera’s flash in these situations, and the shadows will go away, leaving you with a nice image. Better yet, find a nice shady spot to take your photo, and keep your flash on.
Rule #3: When you have a dark subject in front of a bright background, turn on your flash.
This happens most frequently when you have someone standing inside in front of a big window. The camera sees a bunch of light coming through the window, so it doesn’t trigger the flash. You are left with a silhouette of your subject. In this situations, you have two options. You can overexpose the image to brighten your subject and make everything outside the window look white, or you can turn on your flash. If you turn on the flash, your subject will be lit from the flash, and as a bonus you’ll be able to see the scene outside the window as well.
Rule #4: When you have a light subject in front of a dark background, consider turning off your flash.
This is where the deer-in-the-headlights look comes from. You’re taking a photo of a friend in a bar, and your flash fires to light up the person’s face. If you find yourself in this situation, it might be better to turn your flash off. If you turn your flash off, and can set the camera on something steady so the camera doesn’t shake, and tell your friend to hold steady (which might be difficult after a couple of drinks), you’ll probably get a better picture. The bonus here is that you will probably capture a lot more of the mood lighting, because you are relying on the bar’s lights and not your flash.
If you have a flash that has a swivel head, you might want to try bouncing the flash off a wall or ceiling. This will give you more even lighting around most of the scene as well as light your subject. Watch the color of the wall you are bouncing off of though, because your photo will take that color tone.
If neither of these two methods are working, try taking a few steps back and using your camera flash. This reduces the amount of strength of the light on your friend’s face and will lighten the background a bit, thus improving your photo.
Tip: A flash can be very useful in landscape photography
Most people assume a flash doesn’t really come into play with landscape photography. Most of the time this is true, after all you should be using a tripod in any low-light situation, so you don’t need the extra light. However, there are times when a flash really comes in handy. For instance, any kind of macro photography can benefit from a flash. Flowers become more radiant, and you’ll get quicker shutter speeds for close-ups of other objects (meaning less blur due to camera shake, when it doesn’t work to use a tripod). Flashes also come in handy when you are taking photos at night. For instance, if you are taking a wide angle shot of something on the ground, with a starry sky behind it, a flash can come in really handy. Take your long exposure, and fire the flash to “paint” the foreground a little brighter.
When should I get an external flash?
A few years back, I was going to attend a wedding and had to choose between buying a faster lens or an external flash for my DSLR. Being all too familiar with the washed out faces from a flash, I was leaning toward buying the lens. Luckily, some people online told me to go with the flash. I did, and got some really amazing shots at that wedding that I never could have gotten with the fast lens alone.
If you are thinking of buying an external flash, but aren’t sure if you’ll benefit from using it, stop reading right now and buy the flash. Buying an external flash (I have a 430EX II for my Canon) is one of the single best investments you can make to improve your photography. There is a learning curve, but if you take the time to learn how to properly adjust and bounce your flash, you will love the results. To make your life as easy as possible, make sure the flash you buy supports TTL (Through The Lens) metering for your camera. A lot of third-party lenses don’t, and while you can save some money going that route, it isn’t worth the extra headaches jumping straight into manual flash operation. With TTL, your camera controls your flash exposure so you don’t have to worry about it. Much, much easier. Later, you can always turn TTL off if you want to add your own creativity to the shot with your flash.
In the end, if you follow a few simple rules, you can greatly improve the photos you make. Just try to think about exactly what light your scene is lacking and, if the need arises, let your flash give that little bit of extra boost to make a good photo great.
Mountain Goat
It’s not too often that I dabble in black and white photography, but when I saw this photo I thought it would be a perfect opportunity.

You have to have a different mindset when taking black and white photos. You almost have to train your mind to see in black and white. Black and white obviously can’t show vivid eye-popping colors, so you have to make use of what can be portrayed in a black and white image: textures, contrast, shapes, and composition. In the photo above, the goat stands out because the texture of his fur is different from the background. The goat also has some stronger shadows on his face, which helps with contrast.
I also cropped the photo so the goat was looking into the frame and isn’t the center of attention. The goat looking to the left is an advantage too. Your eyes kind of follow the goat’s gaze to the left side of the photo, and then “read” from left to right back to the goat. It kind of makes viewers dwell on the photo longer than just a passing glance.
I had to crop this photo quite a bit to get this composition (and this was taken with a strong zoom lens), so it’s not a high enough resolution to print, but I wanted to share the story.
Matting Prints
A couple months ago I decided to try and sell my work at a local gallery. I submitted my portfolio and a couple of weeks later, I heard the great news that they wanted to accept my work into their displayed collection. I was thrilled. The problem was, I didn’t know exactly how to showcase my work in a way that was ready to sell. It was time to do some research.
Most photographs sold in a general art gallery expect you to sell a matted print. This is a nice option because it allows the buyer to choose the frame to fit their home decor, and saves you the guesswork as the artist. But how exactly do you mount a photograph in a mat? And how do you protect the product so it arrives in the customer’s hands in perfect condition?
There are several ways to mount a photograph, so you can certainly try out a couple to figure out what works best for you. This method worked well for my initial run of 36 prints, and I expect to use it for the next run as well.
First, you need materials. To properly mount a photograph, here are the materials you will need:
- The mat itself
- A backboard
- A plastic sleeve
- Linen tape
There are several websites that sell these materials. I purchased mine from a company called Golden State Art. They sell several kits that include a mat, backboard, and sleeve all together for very reasonable prices. It was nice because I didn’t have to worry about the sleeve being the right size to properly fit the mat and backboard. It was a set, so I knew it would work. Note that Golden State Art offers quantity discounts if you purchase more than 20 sets. Even though I wasn’t mounting 20 photos of each size (I was printing 3 different sizes), I ended up purchasing 20 kits of each size just to get that discount. Eventually I will use them. One really nice thing about the quantity discount is that you can order different color mats as long as they are the same style, and still get the deal.
That takes care of most of the materials, but you’ll still need to find some good linen hinging tape. Linen tape is nice because it’s sturdy and matches the white color of the mat. It’s also easy to work with, giving you some leeway if you need to peel and re-attach it. I did some research and found a lot of recommendations for Lineco brand products. Make sure you get self-adhesive, and not the gummed tape. Gummed tape needs to be wet in order to stick, and I’ve heard it’s a real hassle to get the tape wet and placed without making a mess of it. I ordered Lineco’s 1.25″ wide tape in a 150′ roll, but they also have smaller rolls as well.
Now that we have the materials, it’s time to get started with the mount. The first thing you’ll want to do is hinge the mat to the backboard. Place them on a level surface edge-to-edge, with the mat face down. Then cut a piece of tape about 90% of the length of the mat and place it evenly between the mat and the backboard. It should look something like this:

After the tape has been placed, fold the mat closed and make the initial crease in the tape. It should fold smoothly.
Now it’s time to position the artwork on the backboard. Close the mat/backboard most of the way and position your photo on the backboard. Once it is in a good position, place a heavier object on the print to hold it in place. As you can see in this photo, I used a lens on top of a cleaning cloth to avoid scratching the photo.

Now we are ready to tape the photo to the backboard. When attaching the photo to the backboard, you only want to tape the top of the photo. The rest of the photo should hang freely. The reason for this is that the photo will naturally expand and contract with temperature, and you want to allow it to do this without rippling in the frame. The tape is strong enough to hold the photo against the backboard and just let it hang naturally behind the mat.
For my 5×7″ and 8×10″ prints, I used 2 pieces of tape the attach the photo to the backboard. For my 11×14″ prints (as in the image below), I used a third piece of tape as well. With the photo held down by the weight, gently lift up the top of the photo and place a 2″ strip of tape face up, sticking against the back side of the photo. Just slide the tape halfway under the photo, and then let the photo rest on the tape, pressing gently to seal it.

As you can see, nothing is holding the print to the backboard at this point because the tape is face up. To make the final attachment to the backboard, you’ll use a second piece of tape for each point. Cut 2-3″ strips of tape and attach them horizontally across the tape tabs you placed in the previous step, pressing them onto the backboard. Try to attach these strips of tape as close to the photograph as possible, otherwise you will have sections of tape face up that will stick to the mat. It should look something like this:

Your photo mounting is now complete. Close the mat on top of the backboard and you are ready to go. In my case, I wanted to sign and label the print. There are lots of opinions about the best way to do this, but I decided to use pencil and write behind the mat on the backboard.

To complete the product, slide the image into the plastic sleeve. The sleeves from Golden State Art are nice because the adhesive is on the envelope side of the sleeve, and not on the folded flap. This makes it very easy to slide the mat into the sleeve or make adjustments, even after the adhesive is exposed. Press the flap against the adhesive to seal it shut. Here’s the final product:

Total time for the 36 photos I prepared was 6-7 hours over a few nights. Once you get used to the process, it goes pretty quickly, but it can take awhile to get in the groove. It’s great to see your work showcased in this kind of mat, and even better once you frame it and see it on the wall.
