Controlling depth of field is one of the first more advanced topics that an amateur photographer will learn about. Most photographers will switch from full auto mode on their camera to “P” mode and use that for quite some time. Then they will start to look for more control, and for many the next step is controlling the depth of field, or which part of the photo is in focus. When a camera focuses, it makes an object a certain distance away become sharp.
However, even if the focus is set on a certain object, usually things a small distance in front of the object and a small distance behind the object are also sharp. The depth-of-field refers to how much distance in front and behind the focus point is still sharp in a photo. In a landscape photo, you might have a depth of field of several miles, while a close-up macro photo might have a depth of field of less than an inch. When an object is outside the depth of field, it shows up blurry in the image (this is how you get the nice “bokeh” blurry background in portraits, by having a small depth of field focused on a person, and everything in the background outside the depth of field).
Aperture There are a few ways to control depth of field. The most common way was alluded to above, by using aperture priority (Av or simply A) mode on the camera. Aperture priority allows the photographer to set the aperture, which usually has values like 1.4, 2.0, 2.8, 4.0, 5.6, 8.0, 11.0, 16.0, 22.0, etc…
Aperture can be confusing because the number is reversed from what you might expect. A big aperture is actually a small number, and vice versa. For example, an aperture of f2 is a “big” (sometimes called “wide”) aperture, while an aperture of f16 is a “small” (or “narrow”) aperture. This is because the aperture is actually a ratio, equal to the focal length of the lens divided by the width of the lens opening. So a 100mm lens at f2 would have a big lens opening of 50mm. While the same 100mm lens at f16 would have a small lens opening of just 6.25mm.
However, that’s all details and what really matters is how changing the aperture changes the depth of field. Here is where the aperture number makes more sense. You can think of the aperture value representing how much is in focus. So a small aperture number (like f2) results in a small depth-of-field and not much area in focus. A big aperture number (like f16) results in a large depth-of-field and a lot of the image in focus.
Note that you typically don’t want to use aperture values that are larger than about f11. This is because of an effect called diffraction, which causes the whole image to become less sharp. Explaining diffraction is beyond the scope of this article, but the point to take away here is that you don’t want to use too narrow of an aperture.
Focal Length Another lens property that affects the depth of field is the focal length of the lens. The more you zoom in, with everything else constant, the less depth of field you will have. So if you zoom out all the way (wide) on your camera, a lot more will be in focus. Likewise if you zoom all the way in, then a lot less of the frame will be in focus.
Distance from Subject An additional aspect that affects the depth of field is how far you are away from your subject. If you are close to your subject, then depth of field decreases, but if you are far away then depth of field increases and more will be in focus.
How low can you go? So let’s say you want a buttery soft background for a portrait you are taking. You’ll want to set your aperture value as low as possible. This will depend on the lens on your camera, but generally lenses with wide apertures cost a lot more because you need more glass to allow the extra light into the camera. You also have to be careful when setting your aperture too low, because you’ll have a very small depth of field to work with. Next, you will want to zoom all the way in on your lens. Finally, you’ll want to get as close as possible to fill the frame with your subject.
When you combine all three of these, you can get a very narrow depth of field, and that can be a bad thing.
This problem bit me just a few months ago. We were on a trip to Puerto Rico visiting the rain forest. I saw a lizard I wanted to photograph, so I zoomed in and without thinking too much about it I took the following image:
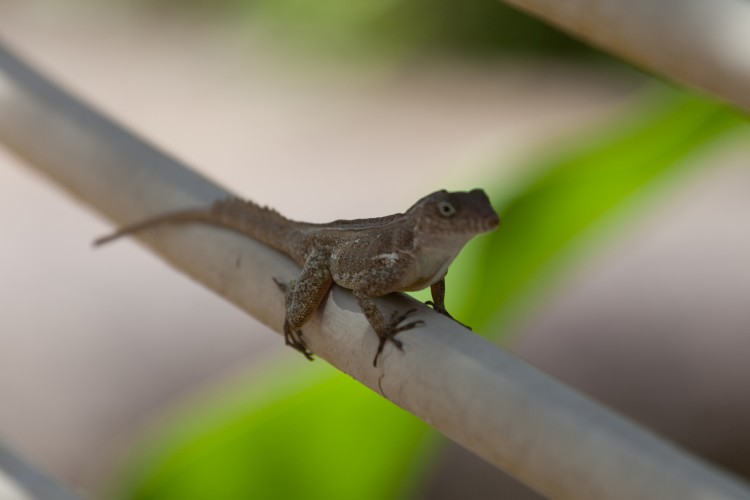
If you look carefully at this photograph, you’ll notice that I missed the mark. My depth of field is not big enough for the whole lizard to be in focus. I focused on the body of the lizard, but an inch in front of the focal point is already starting to get blurry. The reason for this is that I had my lens zoomed all the way in (it was a small lizard, so I wanted it to fill the frame), and I tried to get as close as possible while also setting my aperture to the lowest value my lens supported (f4 in this case).
If I was paying more attention, I would have set my aperture to f5.6 or even f6.3. This probably would have been enough to get the entire lizard in focus. The other alternative would be to focus on the lizard’s eyes instead of just his mid-torso. This is a general rule when photographing any animal or person. You want the eyes in focus because that’s what we look at first and the look in someone’s eyes gives you the best view at their feelings and emotions at that point in time. It’s how we connect.
Landscape Photos On the opposite end of the spectrum we have landscape photos. For landscapes, we want a big depth of field with a lot of area in focus. The best way to do this is to set the aperture to f8-f11 and use a wide angle lens. This will result in a wide depth of field.
A trick here is to focus about 1/3rd of the way into the frame. This will take advantage of a focus property called hyperfocal distance (again, this is too big of a topic to explain in this article). If you focus at the hyperfocal distance, then everything behind that focus point will be sharp in the final photograph. So pick a tree or a rock about 100-200 feet away from you and focus there.
Wrap-up So that’s a crash course in depth of field. The only way to master depth of field is to spend time working on using the different apertures and focal lengths on your camera. Go on a photo walk and play with the aperture settings while varying the distance between you and your subject. This will give you a better idea of what settings you should use to get the desired depth of field for a particular photo, so you’ll be prepared to capture that next amazing lizard shot.