Technique

Photo Walk at Deerfield

I thought it might be fun to create a video of a photo walk. I was out at a local nature park on a winter morning (okay, it was spring, but Michigan doesn’t always behave like the season suggests). In the video, I offer some tips for photographing in the winter, and more specifically in an area like Central Michigan. I also talk a little bit about composition.

Check it out and let me know what you think…

Depth of Field

Controlling depth of field is one of the first more advanced topics that an amateur photographer will learn about. Most photographers will switch from full auto mode on their camera to “P” mode and use that for quite some time. Then they will start to look for more control, and for many the next step is controlling the depth of field, or which part of the photo is in focus. When a camera focuses, it makes an object a certain distance away become sharp.

However, even if the focus is set on a certain object, usually things a small distance in front of the object and a small distance behind the object are also sharp. The depth-of-field refers to how much distance in front and behind the focus point is still sharp in a photo. In a landscape photo, you might have a depth of field of several miles, while a close-up macro photo might have a depth of field of less than an inch. When an object is outside the depth of field, it shows up blurry in the image (this is how you get the nice “bokeh” blurry background in portraits, by having a small depth of field focused on a person, and everything in the background outside the depth of field).

Aperture There are a few ways to control depth of field. The most common way was alluded to above, by using aperture priority (Av or simply A) mode on the camera. Aperture priority allows the photographer to set the aperture, which usually has values like 1.4, 2.0, 2.8, 4.0, 5.6, 8.0, 11.0, 16.0, 22.0, etc…

Aperture can be confusing because the number is reversed from what you might expect. A big aperture is actually a small number, and vice versa. For example, an aperture of f2 is a “big” (sometimes called “wide”) aperture, while an aperture of f16 is a “small” (or “narrow”) aperture. This is because the aperture is actually a ratio, equal to the focal length of the lens divided by the width of the lens opening. So a 100mm lens at f2 would have a big lens opening of 50mm. While the same 100mm lens at f16 would have a small lens opening of just 6.25mm.

However, that’s all details and what really matters is how changing the aperture changes the depth of field. Here is where the aperture number makes more sense. You can think of the aperture value representing how much is in focus. So a small aperture number (like f2) results in a small depth-of-field and not much area in focus. A big aperture number (like f16) results in a large depth-of-field and a lot of the image in focus.

Note that you typically don’t want to use aperture values that are larger than about f11. This is because of an effect called diffraction, which causes the whole image to become less sharp. Explaining diffraction is beyond the scope of this article, but the point to take away here is that you don’t want to use too narrow of an aperture.

Focal Length Another lens property that affects the depth of field is the focal length of the lens. The more you zoom in, with everything else constant, the less depth of field you will have. So if you zoom out all the way (wide) on your camera, a lot more will be in focus. Likewise if you zoom all the way in, then a lot less of the frame will be in focus.

Distance from Subject An additional aspect that affects the depth of field is how far you are away from your subject. If you are close to your subject, then depth of field decreases, but if you are far away then depth of field increases and more will be in focus.

How low can you go? So let’s say you want a buttery soft background for a portrait you are taking. You’ll want to set your aperture value as low as possible. This will depend on the lens on your camera, but generally lenses with wide apertures cost a lot more because you need more glass to allow the extra light into the camera. You also have to be careful when setting your aperture too low, because you’ll have a very small depth of field to work with. Next, you will want to zoom all the way in on your lens. Finally, you’ll want to get as close as possible to fill the frame with your subject.

When you combine all three of these, you can get a very narrow depth of field, and that can be a bad thing.

This problem bit me just a few months ago. We were on a trip to Puerto Rico visiting the rain forest. I saw a lizard I wanted to photograph, so I zoomed in and without thinking too much about it I took the following image:
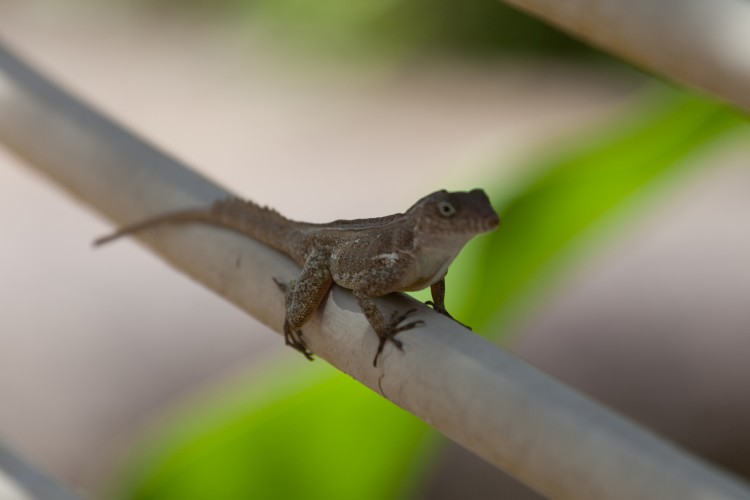
Depth of Field Example

If you look carefully at this photograph, you’ll notice that I missed the mark. My depth of field is not big enough for the whole lizard to be in focus. I focused on the body of the lizard, but an inch in front of the focal point is already starting to get blurry. The reason for this is that I had my lens zoomed all the way in (it was a small lizard, so I wanted it to fill the frame), and I tried to get as close as possible while also setting my aperture to the lowest value my lens supported (f4 in this case).

If I was paying more attention, I would have set my aperture to f5.6 or even f6.3. This probably would have been enough to get the entire lizard in focus. The other alternative would be to focus on the lizard’s eyes instead of just his mid-torso. This is a general rule when photographing any animal or person. You want the eyes in focus because that’s what we look at first and the look in someone’s eyes gives you the best view at their feelings and emotions at that point in time. It’s how we connect.

Landscape Photos On the opposite end of the spectrum we have landscape photos. For landscapes, we want a big depth of field with a lot of area in focus. The best way to do this is to set the aperture to f8-f11 and use a wide angle lens. This will result in a wide depth of field.

A trick here is to focus about 1/3rd of the way into the frame. This will take advantage of a focus property called hyperfocal distance (again, this is too big of a topic to explain in this article). If you focus at the hyperfocal distance, then everything behind that focus point will be sharp in the final photograph. So pick a tree or a rock about 100-200 feet away from you and focus there.

Wrap-up So that’s a crash course in depth of field. The only way to master depth of field is to spend time working on using the different apertures and focal lengths on your camera. Go on a photo walk and play with the aperture settings while varying the distance between you and your subject. This will give you a better idea of what settings you should use to get the desired depth of field for a particular photo, so you’ll be prepared to capture that next amazing lizard shot.

To flash, or not to flash…

When I started paying attention to the quality of photos I was taking, I started to really dislike every shot when I used the flash. Whenever the flash was on peoples faces were washed out (oftentimes with deer-in-the-headlights looks), and backgrounds went dark. I stopped using a flash altogether and instead decided I needed to buy really fast lenses and a camera with a big sensor, so I could take a picture in moonlight and still be able to see the details of someone’s face.

The thing is, you can have the best camera and lens in the world, and still take mediocre photos in low light. Cameras capture light, and when there isn’t any good light to capture, you need to make your own. A flash is really good at making light. So let’s lay down some ground rules.

Rule #1: Know when to turn your flash off.
If you are at a nighttime concert and are more than about 10 feet from the performer, turn your flash off. It’s not going to do you any good, and you’re just going to end up with an image of really bright people sitting in front of you with a performer all in shadows in the background. Countless bad photos are taken this way; just glance at the audience at the next Super Bowl halftime show. In this situation, your flash isn’t making any meaningful light for the scene (you are trying to light a stadium with a candle). Turn your flash off, and let your camera figure out how to get more light for your shot. Most cameras will struggle with the situation, but I guaranty you will end up with a better image.

Rule #2: Know when to turn your flash on.
A lot of people assume that on a bright sunny day, you don’t ever need to use a flash. This is simply not true. When you are taking shots in the harsh mid-day sun, you will have some really strong shadows in your image. When these shadows fall on the faces of the people you are trying to photograph, it’s not going to look good. You need a fill flash to “fill in” the shadows. Turn on your camera’s flash in these situations, and the shadows will go away, leaving you with a nice image. Better yet, find a nice shady spot to take your photo, and keep your flash on.

Rule #3: When you have a dark subject in front of a bright background, turn on your flash.
This happens most frequently when you have someone standing inside in front of a big window. The camera sees a bunch of light coming through the window, so it doesn’t trigger the flash. You are left with a silhouette of your subject. In this situations, you have two options. You can overexpose the image to brighten your subject and make everything outside the window look white, or you can turn on your flash. If you turn on the flash, your subject will be lit from the flash, and as a bonus you’ll be able to see the scene outside the window as well.

Rule #4: When you have a light subject in front of a dark background, consider turning off your flash.
This is where the deer-in-the-headlights look comes from. You’re taking a photo of a friend in a bar, and your flash fires to light up the person’s face. If you find yourself in this situation, it might be better to turn your flash off. If you turn your flash off, and can set the camera on something steady so the camera doesn’t shake, and tell your friend to hold steady (which might be difficult after a couple of drinks), you’ll probably get a better picture. The bonus here is that you will probably capture a lot more of the mood lighting, because you are relying on the bar’s lights and not your flash.

If you have a flash that has a swivel head, you might want to try bouncing the flash off a wall or ceiling. This will give you more even lighting around most of the scene as well as light your subject. Watch the color of the wall you are bouncing off of though, because your photo will take that color tone.

If neither of these two methods are working, try taking a few steps back and using your camera flash. This reduces the amount of strength of the light on your friend’s face and will lighten the background a bit, thus improving your photo.

Tip: A flash can be very useful in landscape photography
Most people assume a flash doesn’t really come into play with landscape photography. Most of the time this is true, after all you should be using a tripod in any low-light situation, so you don’t need the extra light. However, there are times when a flash really comes in handy. For instance, any kind of macro photography can benefit from a flash. Flowers become more radiant, and you’ll get quicker shutter speeds for close-ups of other objects (meaning less blur due to camera shake, when it doesn’t work to use a tripod). Flashes also come in handy when you are taking photos at night. For instance, if you are taking a wide angle shot of something on the ground, with a starry sky behind it, a flash can come in really handy. Take your long exposure, and fire the flash to “paint” the foreground a little brighter.

When should I get an external flash?
A few years back, I was going to attend a wedding and had to choose between buying a faster lens or an external flash for my DSLR. Being all too familiar with the washed out faces from a flash, I was leaning toward buying the lens. Luckily, some people online told me to go with the flash. I did, and got some really amazing shots at that wedding that I never could have gotten with the fast lens alone.

If you are thinking of buying an external flash, but aren’t sure if you’ll benefit from using it, stop reading right now and buy the flash. Buying an external flash (I have a 430EX II for my Canon) is one of the single best investments you can make to improve your photography. There is a learning curve, but if you take the time to learn how to properly adjust and bounce your flash, you will love the results. To make your life as easy as possible, make sure the flash you buy supports TTL (Through The Lens) metering for your camera. A lot of third-party lenses don’t, and while you can save some money going that route, it isn’t worth the extra headaches jumping straight into manual flash operation. With TTL, your camera controls your flash exposure so you don’t have to worry about it. Much, much easier. Later, you can always turn TTL off if you want to add your own creativity to the shot with your flash.

In the end, if you follow a few simple rules, you can greatly improve the photos you make. Just try to think about exactly what light your scene is lacking and, if the need arises, let your flash give that little bit of extra boost to make a good photo great.

Action Panning

One area of photography that I find challenging, yet rewarding, is doing an action pan.  To make a successful panning shot, you need to slow down your shutter speed.  However, this makes it difficult to get a sharp image because you are taking a photo of something that is moving very fast.  So what’s the best technique to do this?

Let’s start with the camera setup.  You’ll want your camera in continuous shooting mode, and trust me when I say you will capture a lot of bad images for every good one.  Next, you’ll want to switch to shutter priority.  This is Tv mode on Canon cameras or S mode on Nikon.  Set your shutter speed to something slower than you are used to.  Maybe 1/50th or 1/100th depending on what you are capturing.  Finally, you’ll want a moderate telephoto lens to make this most effective.  A 70-200mm lens would be a minimum zoom you would want.  A 300mm or 400mm lens would be better if you are trying to track wildlife at a greater distance.

Now, the key here is to practice keeping your subject in the exact same spot in your camera’s viewfinder.  Even if the subject is moving very fast (which this technique works best with), you’ll want to follow the path of the subject very closely.  When the framing matches the look you want to attain, hold down your shutter and let your camera capture a bunch of shots.  After doing this, you can usually go back and look at what you have on the camera, but typically you won’t know if you really have any keepers until later on when you look at your photos on a computer.  Let’s look at some examples.

First, here’s an example of a shot I took a couple of years back.  There was a winter X-games type of event at a local track, and it was very entertaining to watch.

pan_atv

Typically on a fast action shot like this, you’ll want as fast of a shutter speed as possible to freeze the motion and get a sharp frame.  1/1000 of a second, or even higher is desirable.  However, I really wanted to blur out the background and capture the feel of this racer traveling so quickly.  So I slowed down my shutter to 1/200 of a second and did my best to pan with the racer.  When you are photographing something in an environment like this where the subject will be on a single plane (racing along level ground), it’s helpful to have a monopod to help take out some of your handshake.  I mounted my camera on a Manfrotto monopod while capturing this particular event.

Here’s another more recent example at an airshow this past summer.

pan_aircraft

In this situation, a monopod isn’t going to do you any good.  The aircraft that are performing are traveling both horizontally relative to the ground as well as vertically, so you’ll need the flexibility of capturing handheld.  Here I slowed down the shutter to around 1/100 of a second.  If I could go back in time, I would have probably slowed it down a little further still, to 1/50th or 1/30th even.  That would have blurred out the car in the foreground even more.  Again, the key is you need to keep your subject in the middle of the viewfinder as you are taking photos.  This way, even though the subject is moving fast, the relative movement to your camera’s view is very slow.  That’s the only way you are going to catch a sharp image.

The other thing to keep in mind when photographing aircraft with propellers, you really want to have a slow shutter speed at all times.  If you use a high shutter speed to capture a prop-driven airplane, you’ll freeze the prop in mid-air and it will look like the airplane is falling out of the sky.  It doesn’t really turn out well at all, so keep that shutter speed down!

While it might not be too often when you’ll be in a situation where you want a shot like this, it’s not hard to practice this technique so you are ready for the real deal.  Just stand on any busy street corner and try to capture shots of cars as they drive by.  This gives you a chance to get used to tracking subjects, so the next time you are at a sporting event or out photographing wildlife, you’ll be ready.

Beautiful, but Believable

Photography, like other art forms, rarely has a right and wrong answer when it comes to an image. What looks perfect to some people, might look horribly wrong to others. One style which has become popular enough recently to almost be considered cliche is bumping the image saturation. That saturation slider in your photo app is oh-so-tempting, nudging you on to increase the saturation just a little bit more to make those colors pop.

Don’t get me wrong, I don’t have a problem with boosting saturation a little. Most cameras add a built-in saturation boost when creating JPEG images. Some cameras will let you adjust how much saturation is added via in-camera photo styles. If you are shooting in RAW format you won’t get that adjustment, so you’ll want to add saturation to compensate for the occasionally bland images that the RAW format generates. (The benefit to the somewhat bland RAW start image is that you will have a more even histogram and thus better flexibility while making color and exposure adjustments, but I digress.) Many RAW images look more like the scene you remember when the colors are saturated a bit.

The problem with boosting the saturation too much is eventually you get to a point where the colors shown in your photo are no longer believable. If the grass looks more neon than foresty, you’ve gone too far. Likewise, a person’s face being flushed is another indication that the saturation was overdone.

So what can we do as photographers to produce beautiful images with crystal clear blue skies that aren’t overdone? Well, there are a couple of options. First, if you are making a landscape image, try boosting the vibrance instead of the saturation. While the saturation control boosts all the colors, the vibrance control is stronger on the green and blue parts of the spectrum, so you can increase it without blowing the reds and other colors out of proportion.

The second thing you can do is purposefully back off on the saturation bar. When I’m developing an image, I increase the saturation or vibrance to where I think the photo looks best, but then back away about 30% of the adjustment. The amount is slightly different for each image, but purposefully making this second adjustment keeps your perspective in check and ensures that your images still look realistic when you share them.

Keep in mind that (unless you are purposefully going for a surreal look) you should be trying to make your photograph match the scene you remember as closely as possible. That natural feel is what will be most appreciated by your audience in the long run.

Controlling your ISO

Before I really got into photography as a hobby, I kept my camera on the green auto mode pretty much all the time.  This way, the camera can do its thing to make sure the photo turns out right…well 90% of the time.  The problem was with that extra 10% of the time:  I wanted good photos then too.  And sometimes I felt like the photos that did turn out okay could have been a little bit better.  So I started looking towards the other camera modes.

If you’re used to taking photos in the green auto mode, the next mode you’ll want to learn is the P mode.  P stands for Program auto-exposure.  It gives you some control over the settings of the camera, while taking care of most of the rest for you.  The big setting it lets you change is the ISO.

Back in the film days, the only way to change your ISO (or ASA as it was sometimes called) was to put in a different roll of film.  Film with a higher ISO number was more sensitive to light.  If you were going to take photos indoors, you used high ISO film so your shutter speed can be quick and thus avoid blurry shots.  Outside, you could use a low ISO film because there was plenty of light for a fast enough shutter speed.

So why not just use a high ISO film all the time?  Well, that extra light sensitivity comes at a cost.  As you step up the sensitivity, you add grain to the image.  This reduces sharpness and makes everything look a bit fuzzy.  If you look at an older cell phone camera shot in a dark night club, you’ll know exactly what I’m talking about.

Digital cameras are convenient because you don’t have to change the roll of film in order to pick a different ISO.  You can set the ISO separately for each photo you take.  The P mode on your camera allows you to do just that.

Typically a camera will have a native or base ISO where its sensor works the best.  On most Canon cameras, the native ISO is 100.  For Nikon, most cameras shoot natively at ISO 200.  For each doubling of the ISO, the sensor is twice as sensitive and your shutter speed can be twice as fast.  So if you are in a darker room where ISO 100 gives you a proper exposure at 1/15th of a second, bumping the ISO to 200 will give you the same exposure at 1/30th of a second.  Most of the time you want your shutter speed to be 1/60 or faster, so in this case you would bump your ISO further to ISO 400 to get the desired 1/60th of a second shutter speed.

The thing is, you can do a much better job of picking an ISO than your camera can.  If you keep your camera mode on auto, it will probably try to get the shutter speed to be around 1/60th of a second, and boost your ISO to reach that speed.  The problem comes when you are in a darker room and it starts pushing your ISO too high (ISO 3200, 6400, or even higher).  You’re going to end up with more noise in your images, and that’s not good.

Maybe you have calm nerves (have avoided caffeine for awhile, etc) and can hold your camera steady for 1/15th of a second while still getting a sharp image.  If that’s the case, then you can set your ISO in P mode until you see that your shutter speed is going to be around 1/15th of a second.  This will be a much lower ISO than if the camera was trying to reach a 1/60th of a second shutter speed.  You’re custom ISO image will turn out much cleaner.

I shot for years all the time in P mode.  When I was outside, I would set my ISO at 100 and forget about it.  When I went inside, I would start boosting my ISO, but I started to learn how high I could push the ISO before my camera would start producing too noisy of an image.  For my old compact camera, that was ISO 400.  For my first Canon 450D DSLR, I could push it to ISO 800 and still get nice images.  For my 5D Mark II, I can push around ISO 3200 or 4000 and still get solid images.

Once you know how your camera behaves at different ISOs, you can make a decision of whether you should push your ISO higher, or if you should change something else to get a better photo.  Whether that means using a flash, putting your camera on a tripod, leaning up against a wall to steady yourself, etc.  You now have that extra little bit of control.

Sometimes you have no options but to boost your ISO.  The common example of this problem is at weddings when you are in a dark reception hall.  In this situation, I would recommend raising your ISO as high as it needs to be to get a sharp image.  You’ll end up with more noise, but a grainy photo is almost always better than a blurry photo.